Here is a brief overview for using the Infinite Campus Grade Book for CCS Teachers. For helpful videos and documentation that is more in depth, please visit Campus Community. Instructions on how to access Campus Community and other helpful tools can be found on the Campus Support page.

Log in:
Go to www.ccsoh.us and select Staff then the Infinite Campus link. Use the same username and password as your email. Every time you change your login it will change for Infinite Campus as well.
- Click on the App Switcher (looks like 9 little boxes) and select Campus Instruction. If there is not a Grade Book link on the left side of your screen you are in Campus Tools, and not Campus Instruction. You can change this in settings so that you are automatically directed to Campus Instruction when you log in.
- You will also see an option here that says Campus Community; if you select this you have access to news, forums where you can search or post a specific question, and also the knowledge base, which includes videos, tutorials and virtual labs.
In the top right verify the current year and school. The log off button is also in the top right of the screen.

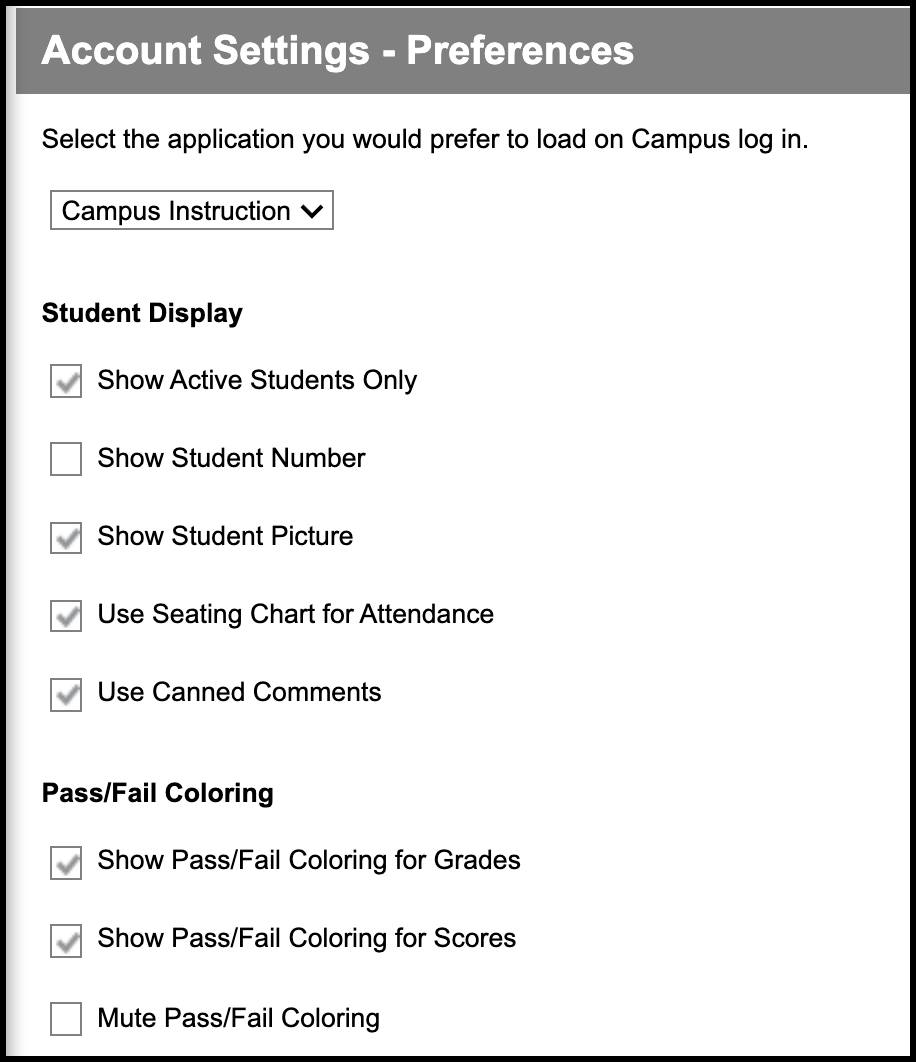
Set Preferences
Before proceeding, it is a good practice to create your account preferences.
This only has to be done once. However, theseThese options can be changed at any time throughout the school year.
If all students are not on your roster in Infinite CampusGrade Book Settings and Preferences
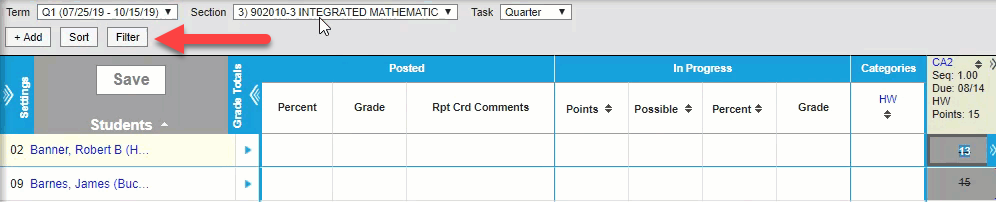
- Options:
- +Add – adds assignments
- Sort
- Filter
- Grade Book Setup: Categories and Grade Calc Options are referred to above.
- Curriculum List: View a list of all assignments in the class selected in the Grade Book.
- Section Groups: Section Groups allow a teacher to group similar sections together in a single grade book view. Groups make scoring assignments easier by combining matching assignments into shared columns in the grade book. Selected groups apply to the grade book view only. However, all calculations and graphs (for Traditional Grading and Standards-Based) presented in the grade book view do cover all students in a section group
- Curriculum Copier: Copy assignments created in one class to other classes.
- Other:
- Help: More information about Box and Whisker diagrams, etc.
- Web Site Address: Communicate a web site for your course through the Portal.
- Preferences


Posting Grades
To post grades from the grade book to an Interim or Quarter report card, follow the steps below:
- In Campus Instruction, click Grade Book on the Action Bar.
- Select the Term.
- Select the Section (Class).
- The Task must be Quarter. Use the drop-down menu to select Quarter, if needed.
- In the In Progress section of the Grade Book, when the grading window is open, Post will display in orange above the Grade column. Click Post.
- The Term will default to the Term displayed in the Grade Book. Use the drop-down to select another Term, if needed. For posting Quarter Grades select Quarter for posting Interim grades complete step 7.
- During the Interim grading window, use the drop-down to select Interim.
- Click OK.
- A Warning window will open ‘Grades will be posted upon save.’ Click OK.
For Quarter Grades, you will be directed back to the Grade Book main page. Be sure to hit the Save Button which should now be red. For Interim Grades please follow the instructions below.

If your school posts letter grades on an Interim follow steps 10-11. If your school enters an ‘S’ or ‘U’ as an Interim grade please follow steps 12-14.
10. The Task moved to the Interim period. DO NOT CHANGE.
11. Click Save. The letter grades are now posted to the student’s interim report card.

12. The Task moved to the Interim period. DO NOT CHANGE.
13. In the Grade column, click on the drop-down arrow to view the grade options. Select or S or U as appropriate.
14. Click Save.
TIP: Instead of using the drop-down to change each grade, click in the Grade cell with the letter grade and type the S or U. Arrow down to the next cell and type S or U. Repeat until all Interim grades are entered for the class. Click Save.

Rosters
- Shows each student with grade level, flags (These can include custody information, LEP information, and IEP information.), and medical alerts.
- Can click on a student name and it takes you to an overview for that student. While you are looking at a student you can click “to student information” in blue at the top of the student information, and it will take you to a much more detailed screen, including the student’s schedule, transcript, and test scores.
- The Roster can be viewed by All (the default), Active, Incoming or Dropped.
- Report Options: The Roster can be printed with or without student addresses.
To get back to Campus Instruction you need to select the box in the upper right corner and then select Campus Instruction.


Seating Charts
- Click new (Upper left side.)
- Pick the course
- Name the chart
- Set the number of columns and rows you want, as well as if you want space between the seats.
- You have the choice for it to autofill, but once you are on the seating chart you also have the ability to drag and drop students. (It automatically will switch the two students with each other if you place a student on top of another student.)
- Select Save
- Click new again and go directly to another class if you want.
- Once you have created seating charts you will be able to use them for attendance.

Student Groups
You would use this in order to assign some students within a course an assignment, without having to assign it to everyone, and then exempt the students who would not be doing the assignment. (This becomes confusing to students to see assignments which they are not to complete.) The most common uses of this include: IEP students with reduced assignments or extended time, students with extended absences, or students with transfer grades from a different teacher or period.
- New
- Name the group (This can be seen by students.)
- Add students to the group.
- Save
Reports (Grade Book)
- Grade Book export: exports assignments to excel
- Student Summary
- Select one or multiple students per page.
- Show assignment detail, and select the information you wish to see on the printed report.
- You can select information regarding the grade summary and extra items selected.
- You can sort by student name or id number
- Select students and assignments
- Generate report.
- Section Summary: This is similar to a paper copy of your Grade Book.
Reports (Planner)
- Blank Spreadsheet: This can be used to take attendance on paper, record assignments, for a substitute to record information on, etc.
Reports (Roster)
- Blank Spreadsheet can be found here as well.
- Portal Usage: Gives weekly login information for the student and parent portal for a one month time period.
Attendance Roster aka Register Report
This report is in Campus Tools. Click the App Switcher > Campus Tools.
- On the Index tab, click Attendance.
- Click Reports.
- Click Register.
- What Report Type would you like? Select Course Section Attendance Register.
- Select other options as appropriate.
- What options would you like to use for printing? Select Include only Instructional Days and Use District Attendance Codes.
- Generate Report.

- Never log into Infinite Campus more than once IN THE SAME BROWSER!
- If you cannot see all of your classes, or students in your class, try the following:
- Check the year at the top of the Infinite Campus page
- Check the school at the top of the Infinite Campus page
- Log out of Infinite Campus, then back in
- Try using a different internet browser
- If you are using a tablet or other mobile device, log into Infinite Campus using a computer
- Try clearing the browser cache:
- Click the Chrome Menu on the browser toolbar
- Select More Tools
- Select Clear browsing date
- A dialog box opens
- Click Clear browsing data
- Clear downloads:
- Click the Chrome Menu on the browser toolbar
- Click Downloads
- Click Clear All on the far right side of the screen
- Click on Planner in Campus Instruction
- Click on the course-section that is having the issue with loading the grade book
- Click on Assignment list
- Click ‘Validate Assignments’ at the bottom
Grade Book Selections
- Select the Current Term (Q1, Q2, Q3, Q4)
- Select the Section (Class) you want to work with.
- Select the Task (Quarter, Interim, Exam or Final)
| Note |
|---|
The task for Exam and Final will only appear in Terms they can be entered. For a full year course, the Exam and Final tasks will appear when Q4 is selected. |
The following Options are available for each class section.
+ Add - Click this button to create an Assignment for the Section selected
Sort - The Sort Button allows you to change the order of the assignment in the section.
Filter - The Filter Button allows you to hide and show Student or Assignment specific criteria.
Grade Book Settings
| Panel | ||
|---|---|---|
| ||
The Settings tab of the Grade Book includes tools used in Grade Book setup, a variety of options for displaying student scores in ways that can help teachers focus on student performance, and other Grade Book display preferences. Use ALT G to expand and collapse the settings menu. The context of the Grade Book is determined by the options selected in the Campus toolbar and the Term, Section and Task dropdown lists above the Grade Book. The Grade Book remembers where you were and opens to the same Term, Section and Task as your last visit. |
Assignment Defaults
| Panel | ||
|---|---|---|
| ||
Assignment Defaults allow teachers to create templates for assignments, with options for Section Groups, Date, Grading Setup, and other assignment elements. Defaults help teachers save time when creating assignments with options that they use often. A teacher can have multiple defaults set. One default can be set to apply automatically whenever assignments are created. |
Assignment Marks
| Panel | ||
|---|---|---|
| ||
Assignment marks allow teachers to create their own grading thresholds, which convert scores entered into percents. Assignment marks are applied to a single assignment at a time. This tool could be useful in instances when you want to create a custom set of scores for an assignment that should have a numeric effect on student score. Teachers also have access to sets of Marks created by their district. Ownership of marks is indicated in the list. For example, an art teacher may want to score projects with a letter grade rather than a point value. The assignment marks would then convert that letter grade into a numeric percentage for grade calculation. |
Categories
| Panel | ||
|---|---|---|
| ||
Categories are like the folders that assignments are sorted into, collecting related assignments. |
![]() Categories must exist before you can create assignments.
Categories must exist before you can create assignments.
Grade Book - Categories
Assignment List
| Panel | ||
|---|---|---|
| ||
View a list of all assignments in the class selected in the Grade Book. |
Grade Book - Assignments
Filter Defaults
| Panel | ||
|---|---|---|
| ||
Filtering options determine which students and/or assignments display in the Grade Book. Sorting options change the order in which assignments display in the Grade Book. Additionally, each column in the Grade Book has double arrows in the header, which can be used to sort the Grade Book by that column (alphabetically by student name or numerically by score or grade). |
Grade Calc Options
| Panel | ||
|---|---|---|
| ||
The grade calculation options are the preferences you select to determine how the Grade Book calculates In Progress grades and proficiency estimates.
|
![]() Grade Calc Options must exist for In Progress grades to be calculated.
Grade Calc Options must exist for In Progress grades to be calculated.
![]() Grade Calc Options must be set for each course section.
Grade Calc Options must be set for each course section.
Grade Book - Grade Calc Options
Grading Scales
| Panel | ||
|---|---|---|
| ||
Grading scales translate In Progress percentages into letter grades. Scales describe the range of score percentages that earn specific grades. The grading scales list includes all scales you've created and all district scales, regardless of the Year or School selected in the Campus toolbar. The district may provide all the grading scales you'd like to use, but you could create your own scales if, for example, you wanted a more rigorous scale for an advanced class that required a higher percentage to earn a standard grade letter. |
Section Groups
| Panel | ||
|---|---|---|
| ||
Section Groups allow a teacher to group similar sections together in a single grade book view. Groups make scoring assignments easier by combining matching assignments into shared columns in the grade book. Selected groups apply to the grade book view only. However, all calculations and graphs (for Traditional Grading and Standards-Based) presented in the grade book view do cover all students in a section group. |
| Warning | ||
|---|---|---|
| ||
If all students are not in the correct section, or students display who are not in your class, notify your school scheduler as soon as possible. Do not wait until the last day or two of the open grading window to enter grades. Allow time to resolve any issues that may occur. |