...
...
...
...
...
...
...
...
...
...
...
...
...
...
...
...
...
...
...
| Table of Contents | ||
|---|---|---|
|
Getting Started
...
Teacher Role
Teachers will enter attendance electronically, by the end of the period except for the last period of the day. For the last period of the day, attendance should be taken and submitted within 15 minutes of the end of the period.
The following exceptions for entering electronic attendance are: substitute teachers, teachers without access to a computer at the time attendance is required, and when the student information system cannot be accessed due to power, network, or system outages. All teachers are to have a paper roster in the classroom in the event of such exceptions. The teacher will send an attendance roster (Register Report) to the office before the end of each period. All substitute teachers will have an Infinite Campus generated student roster for each period they will complete and send to the office before the end of each period. The secretary will enter the attendance through the Classroom monitor and will file the attendance rosters in the appropriate daily attendance folder.
Teachers only have access to enter attendance for the current day. They cannot enter or edit attendance for previous or future days. Teachers will be able to view attendance entered by the office, but are unable to override the attendance. If they have a correction it must be submitted to the secretary in writing. The secretary will make corrections according to Board guidelines.
Secretary Role
Secretaries will confirm that attendance has been entered each period by teachers through the Classroom Monitor.
Enter attendance rosters for substitute teachers, teachers without access to a computer and when the student information system cannot be accessed.
Enter late arrivals using the Attendance Wizard. This process will calculate minutes accurately for students, but will not interfere with attendance entries for other periods.
Generate the Caller Report at the end of the first period, or beginning of 2nd period, after all Attendance is entered.
Enter the early leaves using the Attendance Wizard.
It is recommended to print the register report daily the first week of school. After the first week of school, it is recommended to print the Register Report weekly, or as students are scheduled into the course. Teachers will still need to enter their attendance electronically. The only time the paper rosters will be submitted to the office is if there is a substitute teacher or Infinite Campus is down. The Secretary will retain these rosters as documentation and file them in their daily attendance file.
| Note |
|---|
Note:All teachers must enter their attendance electronically. School Secretaries can enter attendance from an Infinite Campus generated roster for substitute teachers and teachers who do not have access to a computer. It is recommended the attendance roster is signed & dated by the teacher submitting the attendance before sending to the office. |
Page Break
| Info |
|---|
The instructions/screenshots below are for the New Look of Infinite Campus. For directions using the Classic Look of Infinite Campus, use the directions at the bottom of this page. |
Want to know more about the 👀 New Look? Click here.
New Look of Infinite Campus
Period Attendance Entry Step-by-Step
Step One – Enter Absences
Infinite Campus generated student rosters
Classroom teachers are responsible for submitting attendance through Infinite Campus Instruction. It is recommended teachers have current printed Attendance Register by Period for every period available, in the event they do not have access to enter attendance electronically. The secretary will use the roster for attendance entry through Classroom Monitor. Attendance not recorded on an Infinite Campus generated roster should not be accepted.
Printing the Register Report for Teachers
There are three different attendance rosters (aka Registers) that can be generated.
NEW LOOK
PATH Search > Attendance Office > CCS Attendance Reports > Attendance Register by Period (This is the preferred report)
PATH Search > Attendance Office > Reports > Sub Attendance Roster
PATH Search > Attendance Office > Register (This report can't be generated by teachers)
CLASSIC LOOK
PATH: Index > Attendance > Reports > Attendance Register by Period (This is the preferred report)
PATH: Index > Attendance > Reports > Attendance Register by Period (This is the preferred report)
PATH: Index > Attendance > Reports > Sub Attendance Roster
PATH: Index > Attendance > Reports > Register (This report cannot be generated by teachers)
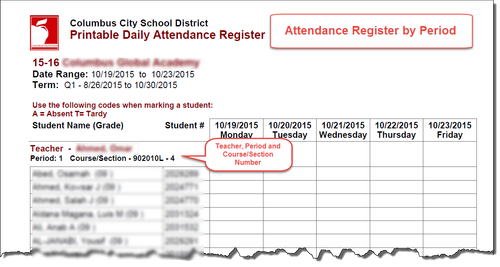
Attendance Register By Period Report (Preferred Report)
NEW LOOK
PATH: Search > Attendance Office > CCS Attendance Reports > Attendance Register by Period
CLASSIC LOOK
PATH: Index > Attendance > Reports > Attendance Register by Period
The Attendance Register by Period rosters can be generated for specific periods of the school day. This is the preferred report as it clearly states the attendance date. It can also be generated for all periods for a specific teacher. This report can be generated for sub teachers.
Select a Term from the drop-down menu.
Enter the date or date range in either format shown.
Select the schedule type from the drop-down menu.
Select a Period defaults to all. A specific period can be selected using the drop-down menu.
Select a Teacher defaults to all. A specific teacher can be selected using the drop-down
Generate Report
The report displays as shown. Please note that at this time, any attendance already entered in Infinite Campus for students will not display on the report.
...
NEW LOOK
...
CLASSIC LOOK
 0
0
age Break
...
Attendance Register Report
NEW LOOK
Path: Search > Attendance Office > Reports > Register
CLASSIC LOOK
PATH: Index > Attendance > Reports > Register
If the attendance roster is being generated for every teacher for every period, generate the Register report. If students have attendance events entered in Infinite Campus, they will display on the report:
Enter the criteria for the report
...
Select Teachers and Sections.
To generate for all classes for all teachers, leave at the default of All Teachers, All Sections Sort by name:
To generate the report for a particular course (ex: homeroom) highlight all of the Homeroom Attendance sections (if applicable). To Select multiple sections, click on the first section, click the shift key, hold the left mouse button, and scroll to the last attendance section.
...
What options would you like to use for printing?
Select Include only Instructional Days
Select Use District Attendance Codes.
...
How would you like to sort students?
Select Teacher or Courses
...
Click Generate Report.
NEW LOOK AND CLASSIC LOOK HAVE THE SAME STEPS
...
...
Page Break
Sub Attendance Roster
NEW LOOK
Path: Search > Sub Attendance > Reports > Sub Attendance Roster
CLASSIC LOOK
PATH: Index > Attendance > Reports > Sub Attendance Roster
The Sub Attendance Roster can only be generated for one day. However, it can be generated for a range of periods, for specific teachers:
...
Effective Date defaults to the current date. The date can be changed by typing in another date or use the date selector. It is imperative that the date on the rosters is the date that the attendance is being recorded for
Period: Leave blank to generate the report for all periods.
Click on a specific period to generate the report for one period.
Use the CTRL key and left mouse button to select specific periods.
...
Teacher: Click on the name of the teacher the substitute is there for.
Use the CTRL key and left mouse button to select specific periods.
...
Click Generate Report.
Page Break
Step Two - Enter Classroom Attendance using Classroom Monitor
Enter the Infinite Campus generated paper roster received for a teacher who is subbing, for a teacher who does not have computer access or the computer is not working. The absences must be entered using the Classroom Monitor.
...
To change the date, type the date or use the calendar tool to select the date. Click the Refresh button to reload the Classroom Monitor for the selected date.
...
Sections displaying as pink indicate that attendance has not been entered and saved
...
Sections displaying as green indicates that attendance has been entered and saved for that course. If all students are present, the teacher will still need to click on the section and click Save.
...
The teachers are listed in alphabetical order by last name. To the right of the teacher’s name, click on the course section. The screen opens to reflect the teacher view of attendance.
All students are Present by default. Mark the student’s absent by clicking the radio button under A or under T for Tardy. It is optional to enter comments in the Comments field in the Classroom Monitor. Comments entered here will display on the Portal. If all students are present, skip to Step 4.
| Note |
|---|
NOTE: Do not enter tardy in the Classroom Monitor if the student was late to school. Only enter Tardies in the Classroom Monitor if the student was Tardy to Class. |
...
Click Save. The page will refresh and display the Classroom Monitor view with the course section just modified in green.
...
| Warning |
|---|
TARDIESIf a student arrived to school on time, but was late getting to class, the teacher may mark the student with a "T" if they are just wanting to indicate that the student was late to their class. The Tardy Unknown will then be changed to a TTC: Tardy to Class using the Attendance Wizard. |
| Info |
|---|
Attendance Taking Blocker CoursesStudents scheduled into Attendance Taking Blocker Courses must be marked absent daily in the classroom monitor. Attendance must be entered on the No Show, Unable to Locate and Located Not Attending blocker courses daily. For more information on these courses, visit the attendance blocker section of Attendance Basics 18-19 - ARCHIVE |
Page Break
Step Three - Verify Classroom Attendance Has Been Entered
Use the Classroom Monitor to verify that attendance has been entered by the teacher. It is also used to enter student attendance for sub teachers or teachers without computer access.
PATH: Index> Attendance > Classroom Monitor
The Classroom Monitor will open to the current date. To change the date, type the date or use the calendar tool to select the date. Click the Refresh button to reload the Classroom Monitor for that particular date.
...
Throughout the day, check the Classroom Monitor for completion of attendance for courses.
...
Sections appearing in pink indicate that attendance has not been taken for that course. Sections appearing in green indicates that attendance has been entered for that course. Notice that the number of students present displays with the number of students scheduled into a course.
...
Hover over the course to view the course number, section number, the course name, and the room number.
...
For a printable list of teachers who have not entered attendance Generate an Incomplete Teacher Attendance report Break
...
Page Break
Step Four - Late Arrivals
Students who arrive after the official start of school are considered to be tardy to school and must sign in at the schools designated attendance area. When a student arrives to school late, the students first and last name, time and reason must be recorded on the Student Late Arrival Log. This log is a paper document that will be used to record the information into Infinite Campus. The log must be maintained in the corresponding daily attendance file.
PATH: Index > Attendance > Attendance Wizard
Late arrivals entered from the log must be entered using the Batch mode in the Attendance Wizard. This process will calculate minutes accurately for students, but will not interfere with attendance that may have been entered by teachers for other period(s).
Date: defaults to the current date, but can be changed by typing in the date or using the Date Selector
Mode: Select Batch
Students: Search for the student by name.
Click Search
The Search results will appear in Columns B and C if you search for an individual student. If you search for multiple students, you must click on their name in Column B to move them to Column C, after each search.
...
Select the appropriate attendance code based on documentation on the Student Late Arrival Log and/or documentation from the
From Date is the date the student reported late to school; From Time is the time school begins for the day.
To Date is the date the student reported late to school; To Time is the time the student arrived at school, recorded on the Student Late Arrival Log. The system will calculate the time the student was absent from school and will calculate the minutes present.
It is required to enter the time the student arrived at school and a comment (as applicable) in the Comments field.
...
Comments Options: Append comments
Make sure that Overwrite Existing Data is marked.
Click Save
| Note |
|---|
The good news is that a student does not have to be marked absent before entering the late arrival! |
...
Page Break
Step Five - Tardy to Class
Students who are at school, but have arrived late to their classroom for various reasons, usually due to being in the breakfast room too long, are considered tardy to class. Attendance can be marked as tardy through classroom monitor by the teacher. The tardy entered by the teacher will be changed to a TTC: Tardy to Class automatically overnight.
Step Six - Printing the Caller Report
...
| Table of Contents | ||
|---|---|---|
|
Step One: Generate Rosters for Attendance Collection
Classroom teachers are responsible for submitting attendance, electronically, through Infinite Campus Instruction. It is recommended that teachers have a current, PRINTED Attendance Roster, in the event that the teacher is absent, and a substitute teacher has been assigned. Also, in the event of a system outage, a printed attendance roster (generated from Infinite Campus) should be used to record attendance.
The secretary will use the roster for attendance entry using the Classroom Monitor. Attendance not recorded on an Infinite Campus generated roster should not be accepted. It is recommended the attendance roster is signed & dated by the teacher submitting the attendance before sending to the office.
Generate a Sub Attendance Roster.
Path: Main Menu > Attendance Office > Reports > Sub Attendance Roster Report
The Sub Attendance Roster can only be generated for one day. However, it can be generated for a range of periods, for specific teachers:
Effective Date defaults to the current date. The date can be changed by typing in another date or use the date selector. It is imperative that the date on the rosters is the date that the attendance is being recorded for.
Period: Select All
Teacher: Click on the name of the teacher the substitute is there for.
Use the CTRL key and left mouse button to select multiple teachers.
Course: Select All
Click Generate Report.
However, the two reports listed below can also be used for attendance collection:
· Attendance Register by Period Report
· Course Section Attendance Register
...
Step Two: Generate Late Bus Route Sheets
Secretaries for all schools will run a route sheet to confirm that the students arriving late on a bus were assigned to ride the bus. The students must be marked on the bus route sheet, not signed in on the Late Arrival log. The route sheet must include the date and time of arrival for the bus, and clearly mark each student that came in on that route.
If a student arrived by personal means of transportation, they must also be added to the route sheet. Enter the late bus students along with students who are tardy to school in Step 5.
...
Step Three: Verify All Other Classroom Attendance Has Been Entered
Use the Classroom Monitor to confirm that attendance has been entered by all present teachers. Secondary Teachers take attendance every period. It is important to verify AFTER EACH period that attendance has been entered by all teachers.
PATH: Main Menu > Attendance Office > Attendance Management > Classroom Monitor
The Classroom Monitor will open to the current date. To change the date, type the date or use the calendar tool to select the date. Click the Refresh button to reload the Classroom Monitor for that particular date. Throughout the day, check the Classroom Monitor for completion of attendance for all teachers.
Sections appearing in pink indicate that attendance has not been taken for that course. Sections appearing in green indicates that attendance has been entered for that course.
...
Step Four: Entering Substitute Teacher and Blocker Course Attendance
At the end of each period, enter the Infinite Campus generated paper roster received for a teacher for who is subbing, for a teacher who does not have computer access, or the computer is not working. The absences must be entered using the Classroom Monitor. This step also includes entering any attendance information for students in the following blocker courses every day: No Show, Unable to Locate, and Located not Attending.
The Classroom Monitor will open to the current date.
To change the date, type the date or use the calendar tool to select the date. Click the Refresh button to reload the Classroom Monitor for the selected date.
Sections displaying as pink indicate that attendance has not been entered and saved
Sections displaying as green indicates that attendance has been entered and saved for that course. If all students are present, the teacher will still need to click on the section and click Save.
The number of student’s present displays with the number of students scheduled.
The teachers are listed in alphabetical order by last name. To the right of the teacher’s name, click on the course section. The screen opens to reflect the teacher view of attendance.
All students are Present by default. Mark the student’s absent by clicking the radio button under A or under T for Tardy. It is optional to enter comments in the Comments field in the Classroom Monitor. Comments entered here will display on the Portal. If all students are present, skip to Step 4.
NOTE: Do not enter tardy in the Classroom Monitor if the student was late to school. Only enter Tardies in the Classroom Monitor if the student was Tardy to Class.
Click Save. The page will refresh and display the Classroom Monitor view with the course section just modified in green.
Tardies
If a student arrived to school on time, but was late getting to class, the teacher may mark the student with a "T" if they are just wanting to indicate that the student was late to their class. The Tardy Unknown will be changed to a TTC: Tardy to Class during the overnight attendance process.
Attendance Taking Blocker Courses
Students scheduled into Attendance Taking Blocker Courses must be marked absent daily in the classroom monitor. Attendance must be entered on the No Show, Unable to Locate and Located Not Attending blocker courses daily. The attendance secretary will go to the Classroom Monitor, locate the administrators name, and mark all students absent. If there are no students scheduled into those courses, the space will be empty.
...
Step Five – Late Arrivals and Late Bus Students
Students who arrive after the official start of school are considered to be tardy to school and must check in at the schools designated attendance area. The Check In/Out kiosk can be used by secondary students who arrive at school late or to track secondary students who leave before the end of the school day. Check In/Out Kiosk is designed to be used by students in a self-service mode to check in and out of school. After scanning in and selecting check in/out, students select a button for the reason.
Students who are at school, but have arrived late to their classroom for various reasons, usually due to being in the breakfast room too long, are considered tardy to class. Attendance can be marked as tardy through classroom monitor by the teacher. The tardy entered by the teacher will be changed to a TTC: Tardy to Class automatically overnight.
Launching the Kiosk
Path: Main Menu > Attendance Office > Scanning > Check In/Out Kiosk
...
Select the Kiosk Mode. Options include Check In only, Check Out only, or both.
Click the Test Printer button to make sure the hall pass printer is ready to use.
If the printer is not configured correctly, the No Printer button will display. Consult the Scanning Printer Setup for configuration details.
Check In/Out Kiosk can be launched in two modes:
In Launch Kiosk mode, students can scan in with a connected barcode reader, by using a RFID reader if Alternate Identifier is enabled in Scanner Settings, or by typing in their student number.
Launch Kiosk w/Camera mode enables the webcam on the computer to read student barcodes on student ID cards.
The Check In/Out Kiosk will launch in a new window. You will be logged out of Campus. The kiosk will stay connected so students can scan in/out as needed.
The kiosk window can be maximized if desired.
When the kiosk is no longer needed for the day, the kiosk window can be closed.
...
Students will follow the procedures outlined in the Attendance Training Agenda to check in to the building. After the students have checked in to school using the kiosk, the attendance staff member for the building will use the Absence Request Processing tool to manage requests submitted in the kiosk by the students. When viewing the Daily Attendance screen, we can see the students who were late have unknown absences recorded.
...
To access the Absence Request Processing Tool, follow the path below:
Path: Main Menu > Attendance Office > Attendance Management > Absence Request Processing
...
The tool will open and display all the students who checked in/out for the day.
You can select specific students by clicking the Toggle Mass Process button at the bottom of the screen. This will allow you to select specific students.
...
In our first example we will process the late bus students. First, select all of the students you have verified were on a specific late bus using the bus route sheets. You may have multiple late buses. Because you are adding a specific comment to each group of students, only select the students on a single bus to mass process them. Then when completed select the next late bus group for processing. To select the students, click the checkbox next to their information.
...
Click the Mass Process button at the bottom of the screen. A dialog box will appear asking for the user to enter an Attendance Code and Attendance Comment.
...
For late bus students, add the comment ‘CCS Trans Issue’ as well as the route number and time of arrival for the late bus. Once you have entered the information, click Mass Process. A blue message box will appear stating the request has been processed and the students will disappear from the Attendance Requests screen.
...
Now we need to process the remaining students. Again, click the checkbox next to the name of the student you wish to process.
...
Click the Mass Process button at the bottom of the screen and enter the Attendance Code and Attendance Comment for the student and then click the Process button at the bottom of the screen.
...
Once all the students have been processed, you will be able to see their updated attendance information in Infinite Campus.
...
However, if the kiosk is NOT AVAILABLE, manual entry of late arrivals will be required. When manually entering a student’s late arrival, the students first and last name, time and reason must be recorded on the Student Late Arrival Log. This log is a paper document that will be used to record the information into Infinite Campus. The log must be maintained in the corresponding daily attendance file. The entries will be added to Infinite Campus following the guidelines below:
PATH: Main Menu > Attendance Office > Attendance Entry Wizard
Late arrivals entered from the log must be entered using the Batch mode in the Attendance Wizard. This process will calculate minutes accurately for students but will not interfere with attendance that may have been entered by teachers for other period(s).
Date: defaults to the current date, but can be changed by typing in the date or using the Date Selector
Mode: Select Batch
Students: Search for the student by name.
Click Search
The Search results will appear in Columns B and C if you search for an individual student. If you search for multiple students, you must click on their name in Column B to move them to Column C, after each search.
Select the appropriate attendance code based on documentation on the Student Late Arrival Log and/or documentation from the
From Date is the date the student reported late to school; From Time is the time school begins for the day.
To Date is the date the student reported late to school; To Time is the time the student arrived at school, recorded on the Student Late Arrival Log. The system will calculate the time the student was absent from school and will calculate the minutes present.
It is required to enter the time the student arrived at school and a comment (as applicable) in the Comments field.
10. Comments Options: Append comments - Make sure that Overwrite Existing Data is marked.
11. Click Save
Unlike Elementary Schools, students do not have to be marked absent before entering the late arrival!
Important Notes about the Kiosk:
Occasionally, the printers will stop printing out passes for students. If this happens, turn the device off, wait 30 seconds and then power it back on. This will usually reset the printer and it will begin to print out the passes that were previously sent to the device.
Be sure to let students know that they will need to pull the pass forward towards their body to tear the paper. Most students tend to want to pull the paper in an upward motion. It works best if they pull the paper towards their body and tear it off from left to right.
To request more paper for your printer, please put in a TDX Support Ticket (Infinite Campus Support Ticket) to request supplies.
Check In/Out Individual Students
Staff members with attendance tool rights can also check in/out an individual student.
Path: Main Menu > Attendance Office > Scanning > Check In/Out
Type in the student ID number and click Enter.
...
An image of the student displays, as well as identification information and the current period schedule for the student. The current period is indicated with a clock icon.
...
The fields displayed for the student in the Check In/Out tool are defined below:
...
The attendance staff member can now select the correct attendance code to check the student in/out.
Add a comment in each affected period, but do not remove the check in/out comment with the time. In this example, the student arrived late due to a doctor appointment, but did not have a doctor’s note. The staff member with attendance tool rights will select the correct attendance code (PMLA) for every period affected.
...
At the bottom of the screen are action buttons to help process the request. The buttons located at the bottom of the screen are defined below:
...
Once the information is entered for the student, click the Confirm button at the bottom of the screen to save the entry. The student’s attendance information is now updated.
...
Step Six – Printing the Caller Report
The Caller Report prints a list of students who are marked as absent unknown and includes the parent/guardian names, home phone number, work phone number and parent/guardian email. This report only prints students marked with an “A” (Absent Unknown) in the Classroom Monitor. It is necessary to print this report before using the Attendance Wizard to change unknown absences to unexcused absences for the day. Once the attendance codes have been changed to unexcused or excused, those students names will no longer appear on the caller report. File this report with the Summary Report, Late Arrival Logs, Early Leave logs in the Daily Attendance File.PATH: Index Tab > Attendance > Daily Attendance in the Classroom Monitor. It is necessary to print this report after the late arrivals have been entered.
PATH: Main Menu > Attendance Office > Daily Attendance Processing > Attendance Management > Caller Report
The Caller Report will generate with a list of students who have an Unknown absence for any period until the time the report is being generated. The The report includes the guardian information, including name and contact numbers.Break
...
The report opens in PDF format; click the the Print icon icon to print the report or the the Save icon icon to save it to your computer.
Each school is directed to have an Attendance team. Designated member(s) of the team are to make phone calls to the parent/guardian of students absent the current day. The The Caller Report (generated above) is an excellent tool to use when making the calls. It It is suggested, and helpful, to keep action notes directly on the caller report, however this does not does not replace documentation required for a students student’s individual attendance folder.
...
You attempted to contact the home number but there was no answer. Record the date you called and state "no answer".
The student was marked Absent Unknown (A) before mom called in that the student would be out ill. Record "parent called in".
Page Break
...
Step Seven
...
– Editing Attendance Reasons
The Daily Attendance tool allows a user to see at a glance all students who have an attendance event (absence/ tardy/early leave etc.) for a selected day. From here, a user with the proper rights may also edit an attendance event.
PATH: Index Main Menu > Attendance Office > Daily Attendance Processing
When a parent calls in or provides a note to excuse the absence for that day and the student’s attendance has already been marked as an unexcused absence, the user can click on the attendance code to make edits. The The conversation must be documented on the Student Absence Notification form.
Select the Attendance code from the drop-down list.
Enter a Comment - CCS requires a comment to be entered when an excused code is used.
...
Click Fill Down
...
(Note: Do not use the Fill Down feature if there is not an absence entered for every attendance period.)
...
Click Save
...
at the top of the tab.
...
Page Break
...
Step Eight
...
– Students Leaving Early
When a student leaves students leave school early, they can sign out using the kiosk or the parent must will sign them out on the Student Release Log. The student's first and last name, time, reason, and the parent/guardian's signature must be recorded on the Student Release Log. This log is a paper document that will be used to record the information into Infinite Campus. The log must be maintained with the daily attendance files.
Just like late arrivals, early leaves will can be manually entered using the Batch mode in the Attendance Wizard. This process will calculate minutes accurately for students , but will not interfere with attendance that may have been entered by teachers for other period(s).
...
To prevent inaccurate data entries, enter Early Leaves at the end of the day. If a student leaves early then returns, the time of leaving and the time of return will be recorded accurately.
...
Path: Index Main Menu > Attendance Office > Attendance Entry Wizard
Date: defaults to the current date, but can be changed by typing in the date or using the Date Selector
Mode: Select
...
Batch
Students: Search for the student by name.
Click Search
The Search results will appear in Columns B and C if you search for an individual student. If you search for multiple students, you must click on their name in Column B to move them to Column C, after each search.
Enter the appropriate attendance
...
code based on documentation on the Student Early Leave Log and/or documentation from the parent.
From Date is the date of the early leave; From Time is the time the student signed out.
To Date is the date of the early leave; To Time is the time school ends for the day.
a. It is required to enter the leave time and a comment in the Comments field.
b. Comments Options: Append comments
c. Leave Overwrite Existing Data checked.
Click Save Attendance.
...
10. Enter Early Leaves no later than the following school day.
...
Page Break
...
Step Nine – Filing and Storing Attendance Notes and Documents
...
Daily Attendance Documentation File - Every school is to have a daily attendance documentation folder for each day of the school year. This folder will be used to file the following documents:
Summary Report
Student Late Arrival Log
Student Release Log
Route Lists of late bus arrivals
Fields trips, etc.
Attendance corrections for that day
Paper Register/Rosters used to enter attendance attendance
Student Attendance File - Every student Every student with attendance events should have a folder forhas an attendance depository on their attendance tab. The following files should be uploaded to the repository:
Parent/Guardian notes
Student Absence Notification Forms Forms
Class Excused Forms
Request for Principal Approval Forms
Other attendance documentation for that student
...