| Info |
|---|
Board Policy 5421 states that the final grade for students in grades 6-12 are to be based on quality points. There is a tool in Infinite Campus for middle and high school teachers and administrators to use to determine if the final grades posted in Infinite Campus are in compliance with Board policy. |
GENERATE THE QUALITY POINTS CALCULATION REPORT FOR REVIEW
You must be in Campus Tools to access the Quality Points Calculator. If you are in Campus Instruction when you log in, follow the instructions listed here to switch back and forth between these two modules.
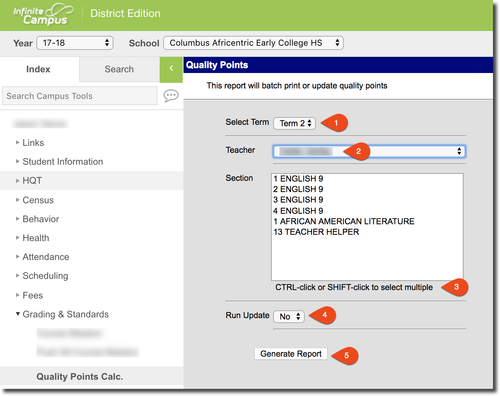
PATH: Index > Grading & Standards
. Click on> Quality Points Calc.
- The Term defaults to the current termSelect the correct Term. Use the drop-down menu to select another term, if needed.
- Administrators - select the teacher for which you wish to run the report.
- Teachers - when you log in you will not have this drop-down, as you can only run the report for yourself.
- Select the course sections to view when generating the report.
- Select multiple course sections by holding the CTRL key while clicking on the desired courses. Select multiple consecutive course sections by clicking on the first course to be selected, hold the Shift key, then click the last course section to be selected. You can also click and hold the left mouse button on the first course section to be selected then drag the cursor down to the last course to be selected, then release the mouse button.
- Leave the Run Update field on No to generate and review the report before making changes. IMPORTANT: Do Not Select YES at this time ... run the report and review first.
- Click Generate Report.

REVIEWING THE QUALITY POINTS CALCULATION REPORT
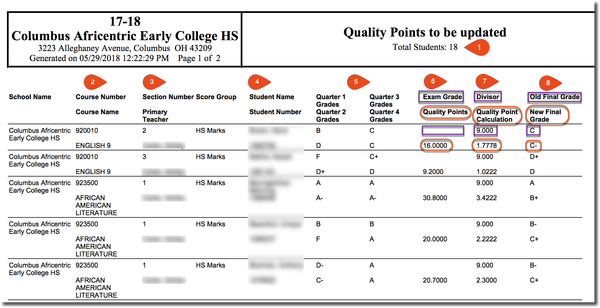
The Quality Points Calc. reports only students with a discrepancy between the posted final grade and the final grade based on quality points. Students with no differences will not appear on the report.
- The number of students for the selected courses will display at the top of the report.
- The course number and name display in this column. If multiple course sections were selected in step 5 on Page 1
- , the courses will show in numeric order. There will not be a page break for each new section.
- Section Number and primary teacher for the selected course sections.
- The Student Name and Student Number are listed.
- Quarter grades are shown with the Quarter 1 grade appearing above the Quarter 2 grade, and Quarter 3 grade above Quarter 4 grade.
- If an exam grade was entered, it will appear above the total quality points the student earned in the selected course section.
- The Divisor appears above the Quality Point Calculation for each student in the selected course sections.
- The Old Final Grade displays above the New Final grade for each student in the selected course sections .


- . The Old Final Grade represents the students current final grade. The New Final Grade is what the report has determined to be the correct final grade based on Quality Points.
![]() NOTE: With the parameter Run Update set to "No", there will be no change to the student's grade.
NOTE: With the parameter Run Update set to "No", there will be no change to the student's grade.
| Warning |
|---|
Missing quarter grades have an impact on the quality points calculations. If you find quarter grades missing for any of your students who are not late arrivals, work with your building principal to resolve the issue. |
TO UPDATE ALL OLD FINAL GRADES TO THE NEW FINAL GRADE:
- Click on the Index tab.
- Click on Grading & Standards.
- Click on Quality Points Calc.
- The Term defaults to the current term. Use the drop-down menu to select another term, if needed.
- Select the course sections to view when generating the report.
- Select multiple course sections by holding the CTRL key while clicking on the desired courses. Select multiple consecutive course sections by click on the first course to be selected, hold the Shift key, then click the last course section to be selected. You can also click and hold the left mouse button on the first course section to be selected then drag the cursor down to the last course to be selected, then release the mouse button.
Run Update: Select Yes from the drop-down menu. Final grades will update as indicated on the report.
Warning IMPORTANT: Selecting Yes from the drop-down menu will run the Quality Points Calculations and update all grades for EVERY student in the selected course sections where the final grade based on quality points differs from the final posted grade.
If you have even ONE student that you do not wish to update using the update tool, you’ll need to update the remaining students individually (see below).
7. Click Generate Report.
The report will generate again with a list of the students with Quality Points to be updated. However, if you look at the grades of students on the report, or generate the Grades Report, you will see that the final grades have been updated. If you generate the Quality Points Calc. again, selecting No in the Run Update field, there will be 0 results.

TO UPDATE THE NEW FINAL GRADE FOR STUDENTS INDIVIDUALLY:
Final grades can be updated for students individually in Campus Instruction, using the Post Grade function.
If you are in Campus Tools, click on the App Switcher and choose Campus Instruction.

- Click on Post Grades on the Action Bar in Campus Instruction.
- Select the Term from the drop-down list if different that the defaulted term.
- Select the course section to be updated.
- Select Final from the drop-down menu in the Task field.
- In the Grades column, select the new final grade using the drop-down menu. Repeat as needed to update the final grade for other students.
- Click Save. Repeat as needed for students in other course sections.

