Walk-In Scheduler ***
The Walk-In Scheduler allows the users to add, modify, and restore an individual student's schedule. With real time data, any changes made will also display in all other areas, including the teacher's roster, grade book, and attendance. The Walk-In Scheduler is accessed through the student's schedule tab. The Infinite Campus Knowledge Assessments for Scheduling must be taken and passed with an 80% or above proficiency every year to retain Infinite Campus tool rights.
Log in to the Campus Community for videos, documentation and hands-on virtual labs related to the walk-in scheduler:
https://content.infinitecampus.com/campus/1705/hovl/walk-in-scheduling/
Every year, to receive your Infinite Campus tool rights you must first take the Infinite Campus Knowledge Assessments and pass with an 80% or above proficiency.
Infinite Campus tool rights are assigned to users based on the passage of the PublicSchoolWorks assessment.
Scheduling tool rights are necessary to be able to enter schedules on Infinite Campus. Once you have passed the appropriate PSW assessment, create a support ticket to have your tool rights enabled ... this is NOT automatic after you pass the assessment.
Submit an Infinite Campus Support Ticket > http://tinyurl.com/campusform2
In this section you will find step-by-step instructions on how to:
- View a Student's Enrollment History
- Give a Student a New schedule
- Change a Schedule
IMPORTANT REMINDERS:
Certify Data Scorecard
Certify promotes a daily, proactive process by an automatic reading of Infinite Campus each night, and sending email alerts to notify school personnel about specific data issues that need to be reviewed, monitored or corrected.
Each rule in your scorecard looks at specific data and makes sure that it is valid. If it appears on your scorecard, it needs to be corrected. The prescription page lists all of the rules defined in Certify, and a 'prescription' for how to fix them. Some may be simple fixes that can be described in a sentence or two, others will link to a page with step-by-step documentation and/or videos to assist you.
Walk-in Scheduler
After the first day of school, the Walk-in scheduler module is used to schedule students.
- Making a change to a schedule will impact how attendance and grades are entered in other areas of Infinite Campus.
- The Delete option is disabled from most user accounts the day before the first day of the school year. Never use Delete to remove a course from a student’s schedule after the first day of school.
- After the first day of school, requests for courses to be deleted from a schedule must be made by submitting an Infinite Campus Support ticket.
- When a student stops attending school do NOT end date the schedule in the Walk-In Scheduler. If the schedule is end dated, attendance cannot be taken. All students MUST be marked absent until Central Enrollment end dates the student enrollment. The schedule will be end dated automatically when Central Enrollment end dates the student's enrollment, using the appropriate withdrawal date. Attendance must continue to be recorded on the student until they are withdrawn from Infinite Campus.
- A schedule can be changed to a No Show blocker if the student has never attended this school year. The Unable to Locate blocker is used when they have attended at least once this school year and stopped attending. Attendance must be entered for the No Show and Unable to Locate sections every day.
Highly Qualified Teacher (HQT)
Ohio will continue to require highly qualified teachers in core academic subjects in the 2018-2019 school year as dictated by current state legislation, report card requirements and the state equity plan. To meet this requirement, secretaries will print the “Principal’s Recording Sheet” and “Teacher HQT Status Sheets” from Infinite Campus. Once the teacher recording sheets are received, the information needs to be loaded into Infinite Campus for each course section.
Scheduling tool rights are necessary to be able to enter HQT information in Infinite Campus. Once you have passed the PSW Scheduling Assessment, create a support ticket to have your tool rights enabled ... this is NOT automatic after you pass the assessment.
Copies of the HQT forms need to be uploaded to Infinite Campus. Please keep the original documents at your site in your compliance notebook, as they would be required in the event of an audit by the Ohio Department of Education and/or the Federal Government.
For more information on HQT Click Here > DISCONTINUED - HQT How to Load HQT Data into Infinite CampusPage Break
Student Gap Schedule Report
- The Student Gap Scheduler tool is used to find students with missing courses in their schedule. This tool may be used to generate a report to show students with a hole in their schedule or to access a variant of the Walk-In Scheduler where these holes may be fixed. The Student Gap Scheduler should be used throughout the year to find students in the system with gaps (empty instructional periods) in their schedule. Certify will identify and report students with schedule gaps on the daily scorecard. empty instructional period)
Double Scheduled in 1 Period Report
- PATH: Index > Ad Hoc Reporting > Data Export > _Scheduling > SCH Double Scheduled in 1 Period
- In the walk-in scheduler, it is possible to schedule multiple courses during the same period. When a schedule has two sections occurring on the same date, during the same period, this is known as double-scheduling. This scenario has the potential to collect wrong attendance and grade marks because:
- Both teachers can mark attendance in the grade book.
- Students cannot physically be in two rooms at the same time.
- Both teachers can create assignments and grades for the same time.
- The Double-Scheduled in 1 Period report (ad-hoc) will identify the students that have multiple sections in the same period. It is recommended that this report be generated and reviewed for data accuracy.
- If a student was accidentally scheduled into the wrong course and will never attend, the incorrect course must be removed from the student's schedule. To avoid the student being double scheduled and for the attendance to be accurate, end date the wrong course and submit an Infinite Campus Support ticket to have the course removed.
Cross Enrolled Students Report
- PATH: Index > Ad Hoc Reporting > Data Export > _Demographics/Enrollment > ENR - Cross Enrolled Students
- Students who are assigned to a program for a full day (Columbus Gifted Academy, Columbus Global Academy, VCAP Full time, etc.) must have the appropriate blocker course entered to indicate that the student is attending the program and are not attending the home school.
- The Cross Enrolled Students Report will export a list of students that have secondary enrollments.
Attendance Change Tracking Report (ACTR)
- PATH: Index > Attendance > Reports > Attendance Change Tracking
- This report will extract attendance changes that have been made for the selected attendance date range during the selected modification time frame. Each modification to a student’s section attendance is displayed in a separate row so please try to limit the length of the Attendance Date Range entered.
- The ACTR is generated and reviewed monthly. The review of the ACTR may identify instances where attendance has been deleted because a schedule changed. If attendance errors are identified the attendance must be corrected. It may be necessary to modify the schedule to re-enter the deleted attendance. Please review the Guideline for Verifying Proper Attendance Coding & Correcting Attendance Data Errors.
Master Scheduling
- The Staff History tab on the course section is used to track the history of teachers for a particular course section. The tab lists active primary teachers, teachers and section staff in addition to former primary teachers, teachers and section staff. A primary teacher must be entered for the section to appear on the Classroom Monitor. Grades and attendance cannot be entered for the section if the course section does not have an active primary teacher.
- Elementary School Unified Arts Teachers must be listed on the Staff History tab for Work and Social Behavior AND Interim Report sections.
- Section Period placement - In the Section Schedule Placement matrix, the check boxes are to indicate what periods and days the section will meet. Do NOT change the period placement on a section after the first day of school.
- It is important to mark sections as 'Homeroom' where applicable. Certain reports and data feeds to third party systems (i.e. Learning Circle, SIRSI (Library System), etc.) rely on this to be accurate.
- The Roster Setup tab on the course section lists the students who are currently in the section and also allows schedulers the ability to quickly create a roster for the section, by selecting a student's name from the list.
- Scheduling tools, such as Roster Setup and Roster Batch Edit, must be used with caution after the school year begins. School staff do not have tool rights for these modules after school starts.
- To minimize errors always use the walk-in scheduler to change schedules after the first day of the school year. The Roster Setup tool must only be used BEFORE the first day of school. If a student needs to be removed from the section after the first day of school use the Walk-In Scheduler to end date the course.
- CCS Course Numbering standards have been established. An "E" after a course number indicates the course is a Special Education course (Example: 6th grade Math # 602000 - Special Ed Math course: 602000E). The complete Course Numbering standards can be found here > Course Numbering Standards
Scheduling Blocker Courses
There should be no empty gaps in your students' schedules. We have created many blocker courses for your use to fill periods on your schedule when students are not in regular academic courses. These course numbers start with an "N" and should already be loaded on your course deck for your use. There are several 'blocker' courses that can be used to denote where the student is during the course of the school day when not in a traditional classroom setting. These blocker courses are available to use in every school; however, the course may need to have sections added before students can be scheduled.
Cross enrolled students that do not attend their Home school due to a secondary enrollment to a program MUST be scheduled into the appropriate blocker course at the home school. The schedule start date must match the secondary enrollment date. This can be found on the enrollment tab. Click here for a full > Blocker Course List
![]() Finishing Grad Requirements Blocker Course
Finishing Grad Requirements Blocker Course
The Finishing Grad Requirements blocker course to be used for students who need to take a course or two to finish their graduation requirements and are not required to be at school for a full day - this course can be used to block out the rest of their daily schedule for attendance purposes. This course is used in conjunction with other courses. It must not be the only course on a student's schedule.
![]() Gifted Academy All Day
Gifted Academy All Day
Used as a blocker course for students attending the Columbus Gifted Academy Program all day. The course should span all periods of the home school's day.
![]() Global Academy All Day
Global Academy All Day
Used as a blocker course for students attending the Columbus Global Academy Program all day. The course should span all periods of the home school's day.
![]() Home Instruction Blocker Course
Home Instruction Blocker Course
The Home Instruction (HOM) blocker course (N92200) should only be used when a student is assigned to Home Instruction and enrolled in Home Instruction as a secondary enrollment. The HOM blocker course (N92200) will be added to the student's schedule using the start date equal to the HOM enrollment start date.
![]() Located - Not Attending
Located - Not Attending
This course is similar to the No Show course, except this is for students that have been located, but are not attending school.
While students are in this course, carry out appropriate attendance interventions, and log the interventions on the student's PLP Log.
![]() Options for Success
Options for Success
When a student is enrolled to the Options for Success program, a school representative from the primary school of attendance with scheduling rights (administrator/counselor/secretary) will end date the student's courses at his/her primary school of attendance on the day prior to the Options for Success enrollment start date. The Options for Success all day blocker course (N92111) will be added to the student's schedule at the student's home school using the start date equal to the Options for Success enrollment start date. Click Here for more information > The Support Center - Scheduling
![]() No Show
No Show
This is a blocker course for students who have not shown up to school but were expected to. Create a section of this course to span the entire school day, and enroll students into this course for attendance taking. This will take students off teacher rosters and will give you an accurate reflection of available seats. When enrolling in the NO SHOW course, use the next school day.
This must only be used when student has never attended and staff are attempting to locate them. While students are in this course, carry out appropriate attendance interventions (log interventions on the student's PLP log), complete the Unable To Locate Student Form. Once completed, and signed by the Principal, submit an electronic withdrawal/end date request form via CCSDAS. Certify will generate a violation when a student has been scheduled into the No Show Blocker for more than 15 days.Click here for more information > Schedule A Student Into The No Show Blocker Course
![]() Unable to Locate
Unable to Locate
This course is similar to the NO SHOW course, except this is for students that attended at some point during the school year but stopped attending. When enrolling in the Unable to Locate course, use the next school day.
While students are in this course, carry out appropriate attendance interventions, complete the Unable To Locate Student Form. Once completed, submit an electronic withdraw request form via CCS DAS. Certify will generate a violation when a student has been scheduled into this blocker for more than 15 days. Click here for more information > Schedule A Student Into The No Show Blocker Course
![]() VCAP Full Time
VCAP Full Time
VCAP Full Time Blocker course (N00065V) is used for students attending VCAP all day and have a Secondary Enrollment in the Full Time VCAP Calendar. Students attending VCAP full time are enrolled in their Home School and cross-enrolled into VCAP. The Home School schedules the student into the VCAP Full Time course blocker (N00065V) effective the date of the enrollment start date in Full Time VCAP, which can be found on the Enrollment History tab for the student. VCAP courses are assigned and scheduled by the VCAP office. Students must apply each year to be in VCAP courses.
Student Grade Levels RD and ND
A grade of “Reading Determination” (hereinafter referred to as “RD”) shall be given to any student who meets all of the following conditions:
- The student is entering the Fourth Grade.
- The student last attended school in another Ohio school district or Ohio community (charter) school.
- The student’s parent/guardian is unable to provide documentation that the student achieved the necessary score established by the Ohio Department of Education on the Reading portion of the Third Grade Achievement Assessment or the necessary score on an alternative reading assessment.
The student in RD Grade level must be placed into a third grade schedule until the appropriate grade level has been determined.
High School Students - Pursuant to Board Policy 5410, any high school student without an official transcript at the time of enrollment shall be classified as “Not Determined” and placed at grade level ND. Students in ND should be scheduled into Ninth Grade courses until the appropriate grade level has been determined. Students entering the Ninth Grade may directly be placed into that grade level rather than at ND. More information on processing RD & ND can be found here > Guidelines for Processing RD & ND Grade Levels
Page Break
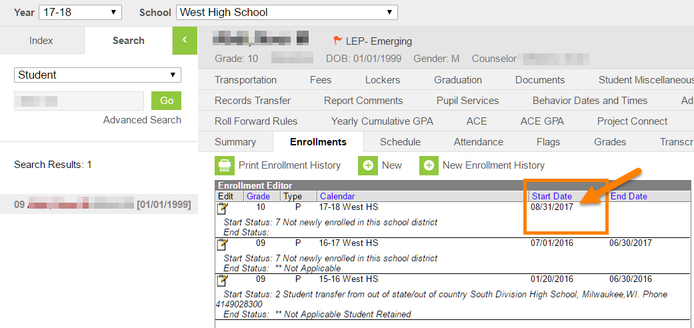
View a Student's Enrollment History
Path: Student Information > General > Enrollments
The Enrollments tab displays each enrollment record within the district for a student.
- The current active enrollment will be displayed in bold font.
- Records will be displayed by grade level with the most recent/future enrollment at the top.
- The type of enrollment will be notated in the Type column
- P (Primary Enrollment) - The main enrollment for the student.
- S (Secondary Enrollment) - Used for students that have a secondary enrollment at the school. For example, an 8th grader taking one math class at a high school may have a secondary enrollment at the high school.
- The school year calendar in which the enrollment exists will be displayed.
Certify Scorecard
All students must have a full schedule effective the enrollment start date. Certify will notify users when a student enrollment start date is equal to today. The notification will become a violation when the student does not have any scheduled courses after enrollment start date.
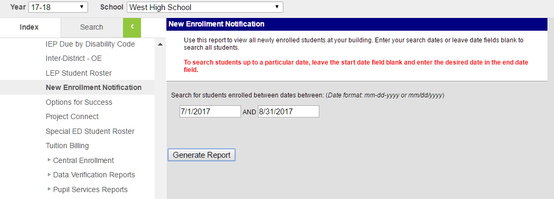
Report to Identify New Students
PATH: Index > Student Information > Reports > New Enrollment Notification
Page break
Give a Student a New Schedule
A student schedule is complete in Infinite Campus when the student has a course scheduled for every period of every day. Every student must have courses scheduled for every day of the enrollment. The scheduler must first view the student's enrollment history to determine the appropriate start date. New students MUST be scheduled using the enrollment start date as the schedule start date. If the student does not get scheduled on the first date of enrollment the attendance must be verified and recorded.
Scheduling Scenario - What Start Date?
The student enrollment begins on 8/31/2018, but the student does not attend school until 9/05/2018, the schedule start date MUST be 8/31/2018. The scheduler must then ensure that the absences for 8/31/2018 and 9/04/18 are entered on the student's attendance.
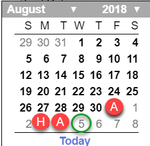
![]() = Absent
= Absent
![]() = Holiday
= Holiday
Once the start date is determined, there are two methods to find courses in which to schedule a student in the walk-in scheduler tool.
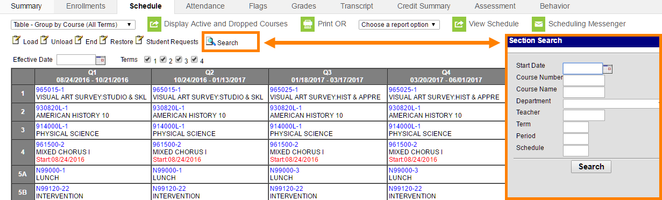
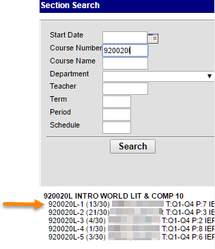
Method 1: Search
PATH: Student Information > General > Schedule
The first method we have to add courses is by using the Walk-In Scheduler Search functionality.
Click search at the top of the schedule. We can search for courses using any combination of the search fields we see on the right hand side of the page. Elementary schools and secondary schools that use teams will specify what team the student belongs to using the team drop-down list.
Click Search button in the Search Results box.
Note that the start date will default to the current date. The date entered will be used as the start date the student will begin attending that section and it will trigger the teachers roster to include that student on that date.
Page break
In the Start Date field, enter the enrollment start date found on the Enrollment tab.
Enter one or more Search criteria, then Search
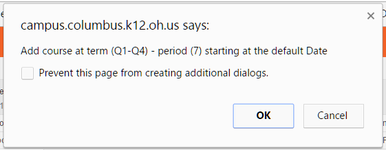
To add a course click on the section in the search results.
A pop-up will appear explaining where the section will be placed. With real time data, any changes made will also display in all other areas, including the teacher's roster, grade book, and attendance instantly.
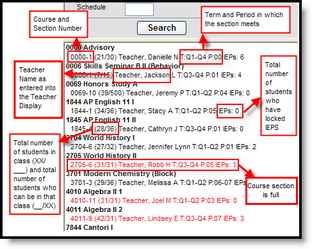
You can also click the Empty spots to get Section Search to appear. You will notice that the Term and Period fields will be filled in based on the Empty slot you clicked and the search will return sections that fit that time period. The Search results will only return sections that meet the term and period clicked. You will need to put the start in the Section Search area in order not to default to the current date.
![]()
REPEAT - In this method continue selecting sections until the schedule is full.
Page Break
Method 2: Request Based
The second way we can add courses is based on Requests. Course requests can be entered several ways. One method of adding a request for an individual student is to manually enter it in the Walk-In Scheduler Request mode.
- Select Student Requests. This view is the default view of the Walk-In Scheduler.
- Type the course numbers that the student should take into the Course # box.
- Set the type: Required Request, Elective Request, Alternate Request.
- Select the Save Reqs icon at the top.
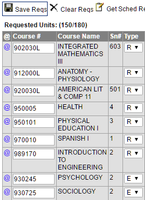
Once saved the course name will display in the course table. After saving the requests they can be loaded into the students schedule.
Loading Course Requests
Select Load from the Walk-In Scheduler, course requests will be loaded to the schedule.
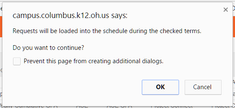
If the schedule is being added after the first day of school uncheck the Terms you do not wish to load, enter an Effective Date, then click load. (Note-If you uncheck a term, yearlong courses will not load.)
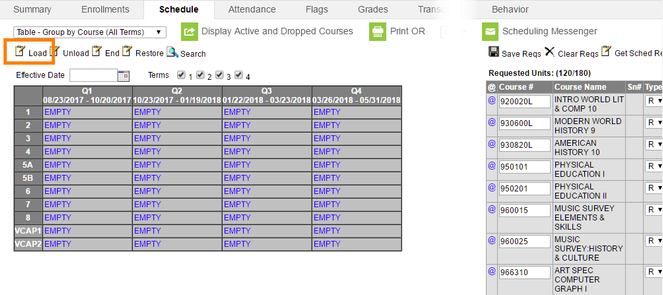
A pop-up will appear explaining where the section will be placed. With real time data, any changes made will also display in all other areas, including the teacher's roster, grade book, and attendance instantly.
Student Requests Manual Mode
In addition to creating a schedule using the Load feature, it is also possible to use requests to view when sections are available for a particular course using the @ symbol to the left of the course number in the Requested Units display. Once the @ has been selected, a new drop-down option will appear labeled Manual Mode with Add, Replace, and Drop & Add. In addition, the sections will be visible in a color-coded grid.
More information on Loading Requests Using Manual Mode can be found on the Campus Community at > Use Request in Manual Mode
Page Break
Change a Student's Schedule
Changing a students schedule is done differently depending on whether or not the student has already begun attending the classes in question and whether the scheduled teacher has entered grades and attendance for the student.
If after referring to the documentation below for changing a student's schedule, you still have questions, please submit a Campus Support Form for additional support.
Schools can use the Walk-in scheduler to add and modify a student's schedule with real-time data. Any changes made in the Walk-in Scheduler will also display in all areas of Infinite Campus such as teacher rosters, grade book and attendance instantly. When modifying or changing a course section you will first need to determine the start and end dates. The start date and end date of a course must NEVER be the same date. Certify will generate a violation if a section is found with the same start and end dates.
The start date is the date the student will begin enrollment in the section. If the student has already been scheduled into a section, the start date for new sections should start the next school day. The dates must be consecutive. For example, if a student has an end date in a course of 8/24, they should have a start date in another course during the same period on 8/25. If a student has an end date of 8/24 in a course (during the same period), and no other course scheduled after this date, attendance cannot be recorded for the student.
Advancing a Start Date
The start date is used to determine the date the student will appear on teacher rosters for grades and attendance. Adding or changing the original start date to a future date will delete all previously entered attendance and grades.
Start dates must not be modified to a future date once the student has attended the course OR if the course has been end dated. The schedule should be re-created by searching for course using the new start date.
Back Dating an End Date
The end date is used to determine the date the student will STOP appearing on teacher rosters for grades and attendance. If a teacher has entered attendance or grades, adding or changing the end date to a date prior to the current date will delete the attendance, and has the potential to delete any grades.
If a student has attended a class even one time, it is critically important to preserve all data associated with that roster entry. In order to preserve this data you must add a drop date to the section the student is dropping and a start date for the section the student is adding. In certain circumstances, it may be necessary to end date a course using a date before the current date. After notifying the building administrator to review attendance and grades, print the current schedule, grades and attendance prior to making any changes to the schedule.
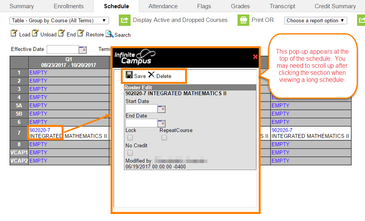
Walk-in Schedule - Search
Users can change a student's current schedule by manually adding an end date for a class. To do this, click on the section number in the student's schedule. A pop up window appears where we can edit the course start and end date information.
When finished click save.
Clicking delete on the pop-up will delete all data grades, attendance, etc., related to that course from the student's record. The delete button will not be available during the active school year.
Manual Delete
To manually delete a section from the schedule, click the section number in the student’s schedule. This will open a new window where the roster entry can be deleted. When the delete option is selected, a warning will appear stating all grades in the teacher’s grade book will be deleted. Click OK to continue with the deletion. (After the first day of school, users will no longer have this option.)
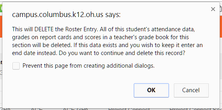
If a course section has been added in error it must be removed from the schedule. The section must be manually deleted. The section delete tool right will be disabled after the active school year has begun. An Infinite Campus Support Ticket must be submitted to have sections removed during the school year.
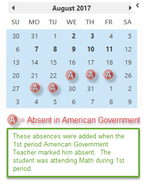
Scheduling Error-Student Scheduled in Wrong Course
August 30, 2018 you are notified that the student has never attended first period American Government that is on his schedule. The student has been marked absent in American Government but has been present at school attending first period Integrated Math every day. In this scenario the student has accrued inaccurate absences for first period because the schedule is not correct. The first period course must be changed to Integrated Math starting on 8/23/2018. The proper procedure in this scenario would be to:
- Add Integrated Math to first period with an 8/23/2018 start date.
- End date American Government with today's date (8/30/2018).
- Print the Period Attendance Detail report, make a note that the absences in American Government are being deleted per a schedule change.
- Review the Administrative Guideline for Correcting Attendance Errors to ensure the proper approval and documentation steps have been followed before making any corrections to the attendance.
- File the Period Detail Report in the attendance file.
- Submit an Infinite Campus Support ticket to delete first period American Government from the schedule.
Page Break
Drop and Add mode Using Schedule Requests
Step-by-step guide
- Verify that the calendar year is correct.
- Click on Student Requests. If it says Search, then you are already in the Student Requests.
- The Requested Units will display on the right side of the page.
- If requests have not been entered for the student, enter them on the right side of the screen.
In the Course # fields, type the course number for the course you want to add to the student’s schedule.
Save Req
An @ symbol will display to the left of the course numbers once saved
Don't know the course number?
To have a handy reference for course numbers on the screen, Select Search on the Index pane, Change the selection to Course/Section and click Go (with nothing in the search box). This will display a list of the courses on the left side of the screen. DO NOT CLICK ON THE COURSE IN THE SEARCH RESULTS or this will close the Walk-In Scheduler.
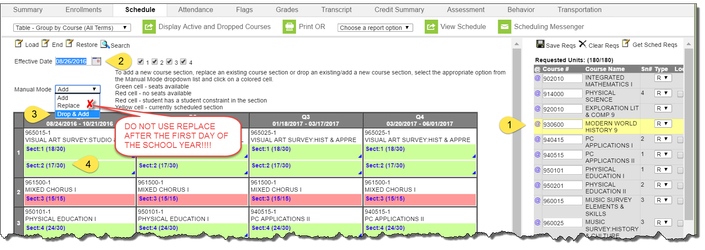
- Select the course to be added to the student’s schedule from the requests list.
- Click the @ symbol to the left of the course number to schedule the student in that course. The selected course is highlighted in yellow.
- Click the @ symbol to the left of the course number to schedule the student in that course. The selected course is highlighted in yellow.
Enter the Effective Date
Effective Date
Remember that courses are ended as of the day before the entered Effective Date. When selecting an Effective Date that has already passed all attendance and grades for the course will be deleted. For Example, If the schedule is being changed on November 15, AND the entered Effective Date is November 10, the schedule will be ended on November 9; all attendance and grades entered for November 10 through November 15 will be deleted.
It may be necessary to use an Effective Date that has already passed; If this cannot be avoided notify the Building Administrator so that the attendance and grades can be reviewed for the student prior to continuing the schedule change.
- Select a Manual Mode: Drop and Add from the Drop Down list
- Add - To Add a course without changing what is currently on the Schedule.
- Replace - To replace the course currently on the schedule. NEVER choose replace after the first day of school.
- Drop & Add - to End Date the current course and add the selected course. Use this mode if adding a full day blocker such as O4S, Columbus Global Academy, or Columbus Gifted Academy
page break
4. Select the available section to be added in the schedule grid.
![]() Green - a section exists during that time and has open seats. Open sections also have a triangle in the lower right corner that when hovered over will indicate that the section is open.
Green - a section exists during that time and has open seats. Open sections also have a triangle in the lower right corner that when hovered over will indicate that the section is open.
![]() Red - a section exists during that time on the schedule, but is at capacity. This may also indicate that the student has a student-to-student constraint in the section. If the constraint is "strict" the students may not be placed in the same section. If the constraint is not marked as strict, the students may be placed in the same section only if there are no other course section options available.
Red - a section exists during that time on the schedule, but is at capacity. This may also indicate that the student has a student-to-student constraint in the section. If the constraint is "strict" the students may not be placed in the same section. If the constraint is not marked as strict, the students may be placed in the same section only if there are no other course section options available.
![]() Yellow - the student is currently scheduled into the course at that time.
Yellow - the student is currently scheduled into the course at that time.
Department of Accountability & Other Support Services
Division of Information Management